Creating a unique animated sky shader for UT3/UDK
INTRO
There are hundreds of sky textures out and about and they're easy to make if you know how. But most of them are static, or have panning textures. I wanted something that constantly changed and was as unique as possible every time.
As a result I created this sky shader with a ton of trial and error into both the parameters and textures used, so I could simulate some realistic looking clouds. Adjusting the parameters results in some rather interesting results as well, so play around with the values and swap textures around to create something that fits your style.
I created this sky for my UT3 map DM-Edge this tutorial is based off the material editor inside UT3. All of which can be applied to UDK as well and with all the fancy updates might result in something better. In UT3 it is designed to fit on the mesh "UN_Sky.SM.Mesh.S_UN_Sky_SM_SkyDome05"
The basic idea of this is to have a very simple base skydome texture, which has multiple textures added and blended on top of it along with that we can use other textures as UV coordinates for textures distorting them.
All the textures except the skydome are black and white so for saving file space import them as TC_Grayscale and CompressionNoAlpha.
Please note the textures and upk download link is at the bottom of this page
THE CLOUDS
To start off with we'll start by putting the first part of the clouds together. All the textures are going to be animated, so attaching a Panner and Rotate allows us to specify settings for a texture. You can set the values to whatever you wish sometimes it is easier to have those larger values when you're changing settings or putting other shaders together to see what's what. The figures I used in the screenshot are the final settings I used. Using multiply results in only the lighter areas of both cloud textures being shown, minimizing the amount of clouds we
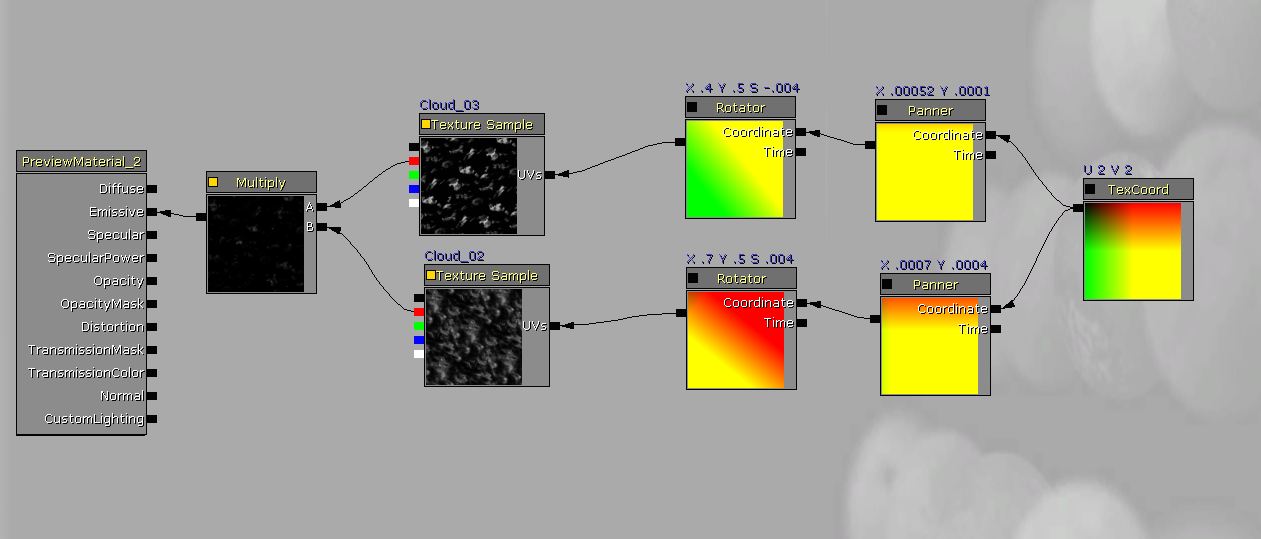
The next step is to take these cloud textures and distort them, for this I created two quick simple textures in Photoshop smudging and blurring black and white together. To distort the cloud textures we need to add their Texture Coords to another texture (Note: you can only add single colour values R, G, B or A to a texture coord. As the textures being used are Greyscale anyway RGB values are all the same. So we will add the rotators to the new texture 'Cloud_Distort' along with that the new texture also gets a rotator and a panner of its own.

You will notice that your output texture at this stage now has a very odd pattern to it. Almost like oil on water (in fact you probably could use it to make such an effect) anyway this is a result of the black and white parts of the distorting texture modifying the UV coordinates of the cloud textures. To fix this we'll add in a 'Constant' (You can add this quickly by holding down '1' and clicking) which will then be multiplied (M and click to add) with the distort texture. Now this allows us to control the intensity of the distortion of the textures. 0 results in full black so no distortion and higher values produce much more visible results. I'll be using a value of .1 for slight distortion here.
Originally I was using cloud textures as offsets, it worked however the result was less desirable, but play around with the texture you use for offsetting.

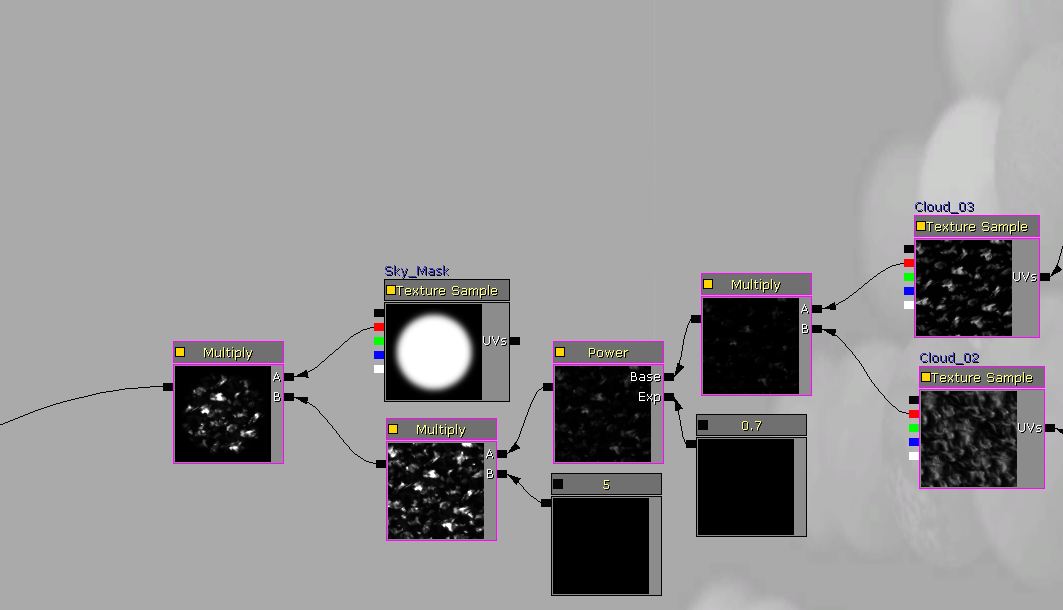
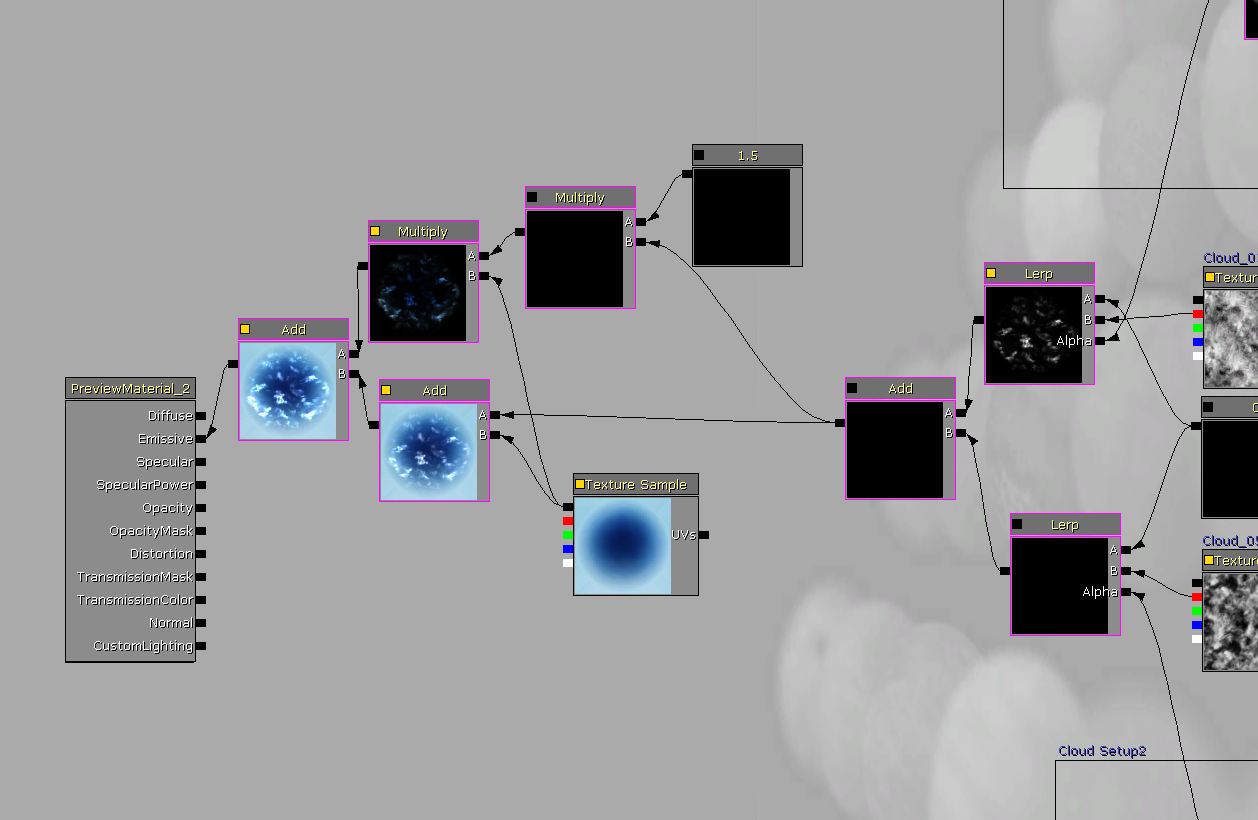
Using many of the nodes available to us in the material editor we can adjust the visual result of the clouds more, using things such as power we can adjust the contrast of the output. Along with adding a multiply with a constant to control the brightness. Also here I have added in another texture this is to make sure the clouds fade out towards the edge of the skydome so they avoid looking odd at the base if you can see it.
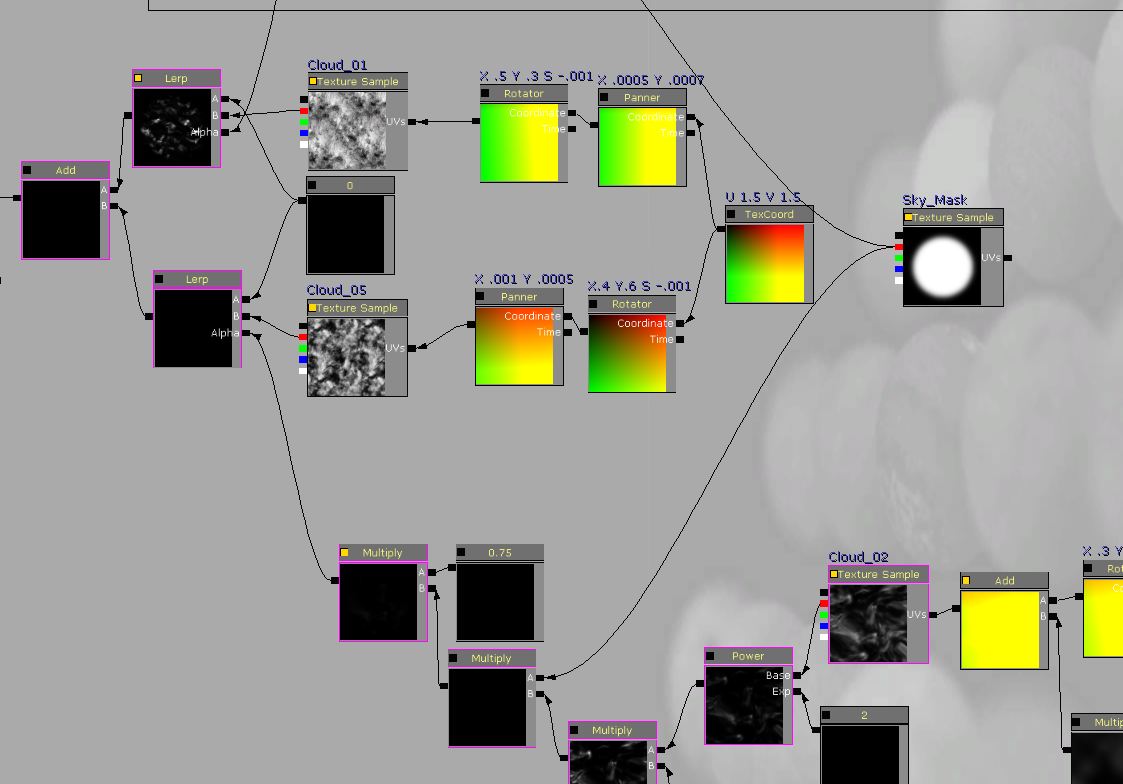
The cloud setup we have just created is going to be used as the alpha in a lerp (Linear Interpolate) this will allow us to use the cloud shapes created to show certain parts of another texture. In this case we're using it to show Cloud_01 texture. You could replace this with a constant value of 1 to get a flat white, but this allows for a little more variation in the cloud texture. Do make sure that you connect this up properly white in the texture for alpha will show what ever is input on B and Black will be A

What we have now is the basis to this whole tutorial multiple textures blended together to create a unique output. To test it you can add in your skydome to see what it looks like.

MORE CLOUDS
The next step is to repeat what we just did but with a few changes in settings and swapping textures over. This will allow us to have two types of cloud in the sky.
So basically copying what we've already put together, but with a few differences, mainly we're only using one texture on this piece. This is so we can have a more defined cloud type to look more like clouds high up in the atmosphere where as the other clouds are smaller and denser (or at least appear so)
An addition to this part of the material is instead of multiplying by a constant after the power it's being multiplied by a texture this adds just a little bit more variation to the fact it is a single texture, so it's brightness isn't the same across the whole sky. The multiply node with the missing A input is for the Sky_Mask texture, make sure you attach it as shown in the next step.

The next step is to add this into the clouds we already have and then into the actual skydome. Just like the last setup to make the final result slightly more unique we'll use this as the alpha in a lerp. We then add the LERPs together keeping all the cloud data from both before adding it to the skydome.
This next step is minor and isn't required however it does make the clouds mix with the sky a little better, as it stands at the moment your clouds unless using a different texture to mine are greyscale. Clouds in the real world will usually reflect some colour of the sky, unless under strong sunlight, so the following multiply and add setup takes the clouds and blends them with the sky colour and adds them back over with a slight tint. You can also multiply the clouds with a Constant value/colour or a Vector Parameter to tint the clouds something different to the sky or to have all the clouds tinted the same colour.
As it is, this material will do the job of an animated sky without issue. However, using kismet, scalar and texture parameters with the help of material instancing, you can control the sky even more. From changing the values of how bright the sky is to how distorted the clouds are. Giving you a different sky, almost every time. If you want, the ability to change those values in real-time to completely adjust the way the sky looks.
MAKING THE INSTANCE
The first step is to replace most of your constant's with scalar parameters and give them the same default values and give them appropriate names (make sure none are named the same unless intended) And some of your textures with TextureParameter2D in the shot below Red are the textures that were turned into param2D's and the blue are the constants turned into Scalar params. The textures were numbered Cloud_1 through Cloud_7 as indicated in the screenshot.

If it's too hard to make out, here is a zoomable image of the full, final, material.
|
|
| Powered by Zoomify |

This is the best place to start testing values and textures; you have hundreds, thousands of options even if you mess with the values of all of them. I spent a while messing with the sky and found that certain textures didn't work so well in some of the slots.
The textures I used in the parameters were.
Param2D - Textures
Cloud1 - Distort/Offset
Cloud2 - 02/03/06
Cloud3 - 02/03/04/06
Cloud4 - 01/02/05
Cloud5 - 01/02/05
Cloud6 - 03/04/06
Cloud7 - Distort/Offset
KISMET
Using kismet I set up a Client side level startup (there is no need for the server to modify sky textures it just results in unnecessary work) which triggers a random link with 6 outputs. As only one of these outputs will be fired at a time all 6 are input into the groups. Cloud1 for example only has a choice between two textures so 3 of the 6 links go into one and 3 into the other, some have more and they are split between them. In cases where there are uneven numbers I plugged it into one that I liked the most :)
Along with that the connections are setup that so no matter what is picked matching textures are avoided, some very odd results can occur if using the same textures with multiply and adding, so knowing which combinations were bad I avoided them.
These kismet events fire off and target the material instance and replace the texture every time a new game is started. In the case of Edge there is a console command that allows a player to fire these events off whenever they want in-game for what reason, I don't know. But they can)

Along with swapping textures every time the game loads I also adjusted all of the scalar parameters, using 'Set ScalarParam' nodes in kismet attached to 'Random Floats' with values set between a maximum and minimum value that I felt safe. Going too high or low on some values can produce some very bad results.

If you want to go even further, you can adjust the 'TexCoord' via material instancing or use kismet to change it in real time. Texture Coordinates use the red and green channels so using the mask node in the material editor you can split the coord into it's two base colours and multiply these with a scalar parameter, then using append you can put both vectors back into one, then adjusting the parameters via kismet with a 'Set ScalarParam' they become changeable in real-time.

Now what you have is a sky that changes its setup every time you either tell it to or you reload the level. But you can go even further, if you so wish. You can adjust the position all your rotators and panners start using kismet. This is simple but you could expand on it even more if you wished to change speeds and distances.
The following shot is actually from the sky setup of DM-Edge. What you can see here is a Scalar Parameter plugged into either the Rotator or Panner of all the textures that use them. I chose to only plug into one so that if kismet failed for whatever reason the sky would continue to animate from one of them.
Plugging a value into the time of a rotator or panner tells it to go to that time in it's animation, in this case we want to randomise the position on game start and then continue to update it during game play if we didn't update it they would stay locked on the randomised position.

The following kismet setup shows how this is done in Edge;
A figure is generated by the 'Random Float' between 0-2500, the Add Float node then adds this number with 0.002 and outputs it to the Float Result. At this point the node fires into the next node which adds 0.002 to the just created float, and then updates that float on its result. That value is then passed to the material instance of the sky via the Set ScalarParam. Then we start an endless loop, which adds 0.002 to the value updating the ScalarParam and thus the time and position of the Rotator and Panners attached to it within the material. It re-fires every 2.5 seconds to keep the movement speed low and fairly smooth.
As usual messing with any of these values will change the final output, so experiment with them.

You will most likley need to create a fallback material for the shader for those people who can't run it. You can make that however you like, by applying it in the properties of your current material. And as it's emmissive you can set it to unlit aswell.
AND THAT'S IT
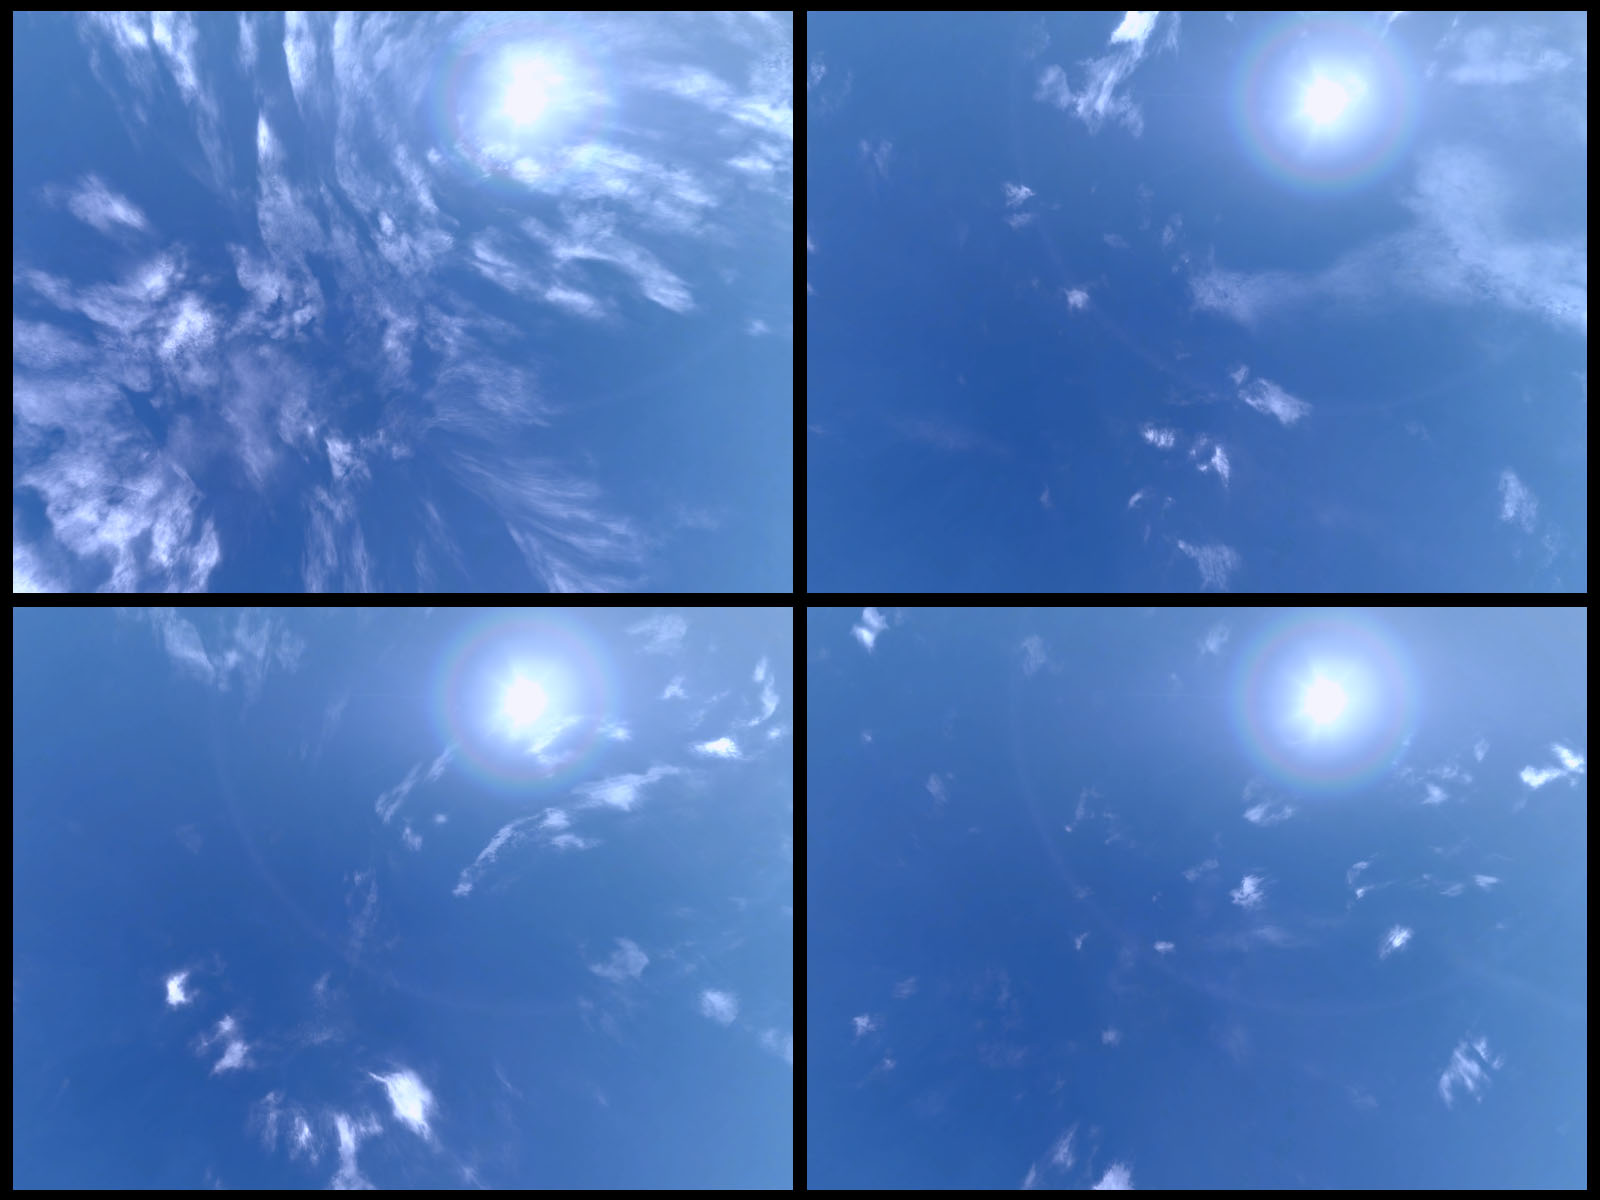
So that's how I created my Sky shader in DM-Edge, the textures are thanks to NASA's huge database of ISS photographs and multiple ones also from my own photographs, they were tiled by myself, and the distortion texture's were created from scratch.
Hope this tutorial is of some use to you and that it assists you in creating a more unique sky for your designs.
Here are 4 shots of the exact same sky shader with 4 different results of many.
DON'T FORGET THE DOWNLOAD!
The download contains all the textures I modified and created for use with this sky, it includes an extra two cloud textures that I didn't use myself but created anyway.
The images are all in .tga format
Along with the textures there is also a UPK (Which will open fine in UT3 and UDK) with the textures already imported plus I included the completed material setup copied from DM-Edge, which you can use freely under the permissions in the readme file.
Download!
16.3MB .rar
Cloud Textures by Scott Coxhead is licensed under a Creative Commons Attribution-NonCommercial-ShareAlike 3.0 Unported License.
Permissions beyond the scope of this license may be available at http://eol.jsc.nasa.gov/info/use.htm.